
How to Integrate Leadsquared CRM
Leadsquared CRM is a marketing automation and sales execution platform that helps businesses increase closing rates and easily manage their pipelines. Integrating with Acefone helps with call-related activities inside CRM that increase your business’s productivity and lead scoring.
Instructions
Follow the steps below to integrate Acefone with Leadsquared.
-
Login to your telephony account.
-
Click on Integrations tab from the side-navigation menu.
-
Move over to the Leadsquared integration and click on Enable.
-
Log into your LeadSquared account.
-
Click Apps > Apps Marketplace
-
Verify it contains the LeadSquared Universal Telephony Connector; if not, then install it.
-
Configure the settings by clicking the configure icon.
-
The below configuration page appears. Now, add Virtual Number in the format +91-XXXXXXXXXX and give a name to it.

- Next, enable the Agent popup API and click Save button.

- Under Click 2 Call, ensure the fields have the following details:
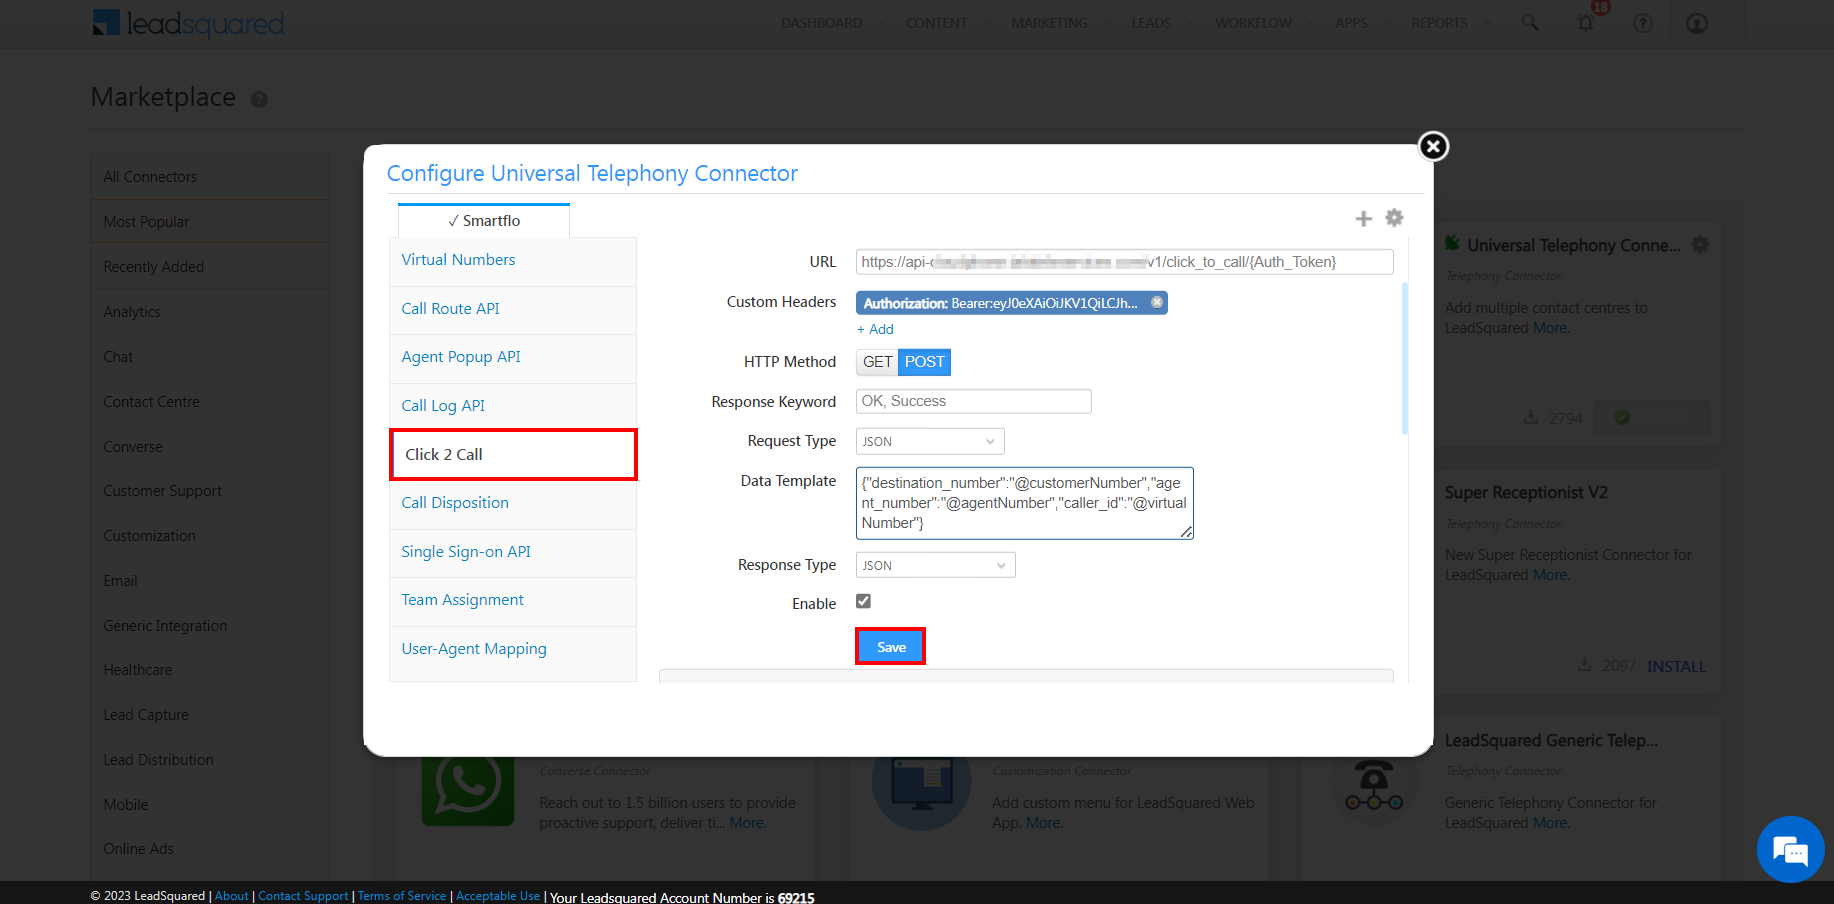
| Field | Value |
|---|---|
| URL | https://api.acefone.in/v1/click_to_call |
| HTTP Method | POST |
| Response Keyword | OK, Success |
| Request Type | JSON |
| Data Template | Without VPN: {"destination_number":"@PhoneNumberWithCountryCode","agent_number":"@AgentNumberWithCC","caller_id":"@VirtualNumberWithCC"} With VPN: {"destination_number":"@PhoneNumberWithCountryCode","agent_number":"{User:@mx_Custom}","caller_id":"@VirtualNumberWithCC"} |
| Response Type | JSON |
Note:In case of calling with VPN, assign your agents extension id to one of the custom parameters under user settings >> other details in Leadsquared and assign it to the agent number parameter in the data template above.
Use the following details for Custom Header:

| Field | Value |
|---|---|
| Name | Authorization |
| Value | Bearer:Auth_Token |
Follow the steps below to generate Auth_Token
a. Login to your Acefone account.
b. Click on API Connect>API Tokens from the side-navigation menu.
c. Click on Generate Token.
d. Give a token name and click on Save.
e. Click on Copy Token to copy the value.
- Now, click on Manage Users.

- Edit the user by clicking on the cog icon present next to it.

- Ensure the Show Phone Call Popup under Other Details is stated as Yes. If not, then you can change the settings by clicking Edit.

-
Login to your Telephony account.
-
Click on API Connect>Webhook from the side-navigation menu.
-
Create five webhooks by clicking Add Webhook.
- Agent Pop up IC to get screen prompt when a prospect/lead call you.
- Agent Pop up OB to get screen prompt when you call a prospect/lead.
- Call Log API LS(Incoming-Answered) to manage logs for incoming answered calls.
- Call Log API LS(Incoming-Missed) to manage logs for incoming missed calls.
- Call Log API LS (Outgoing) to manage logs of outgoing calls.
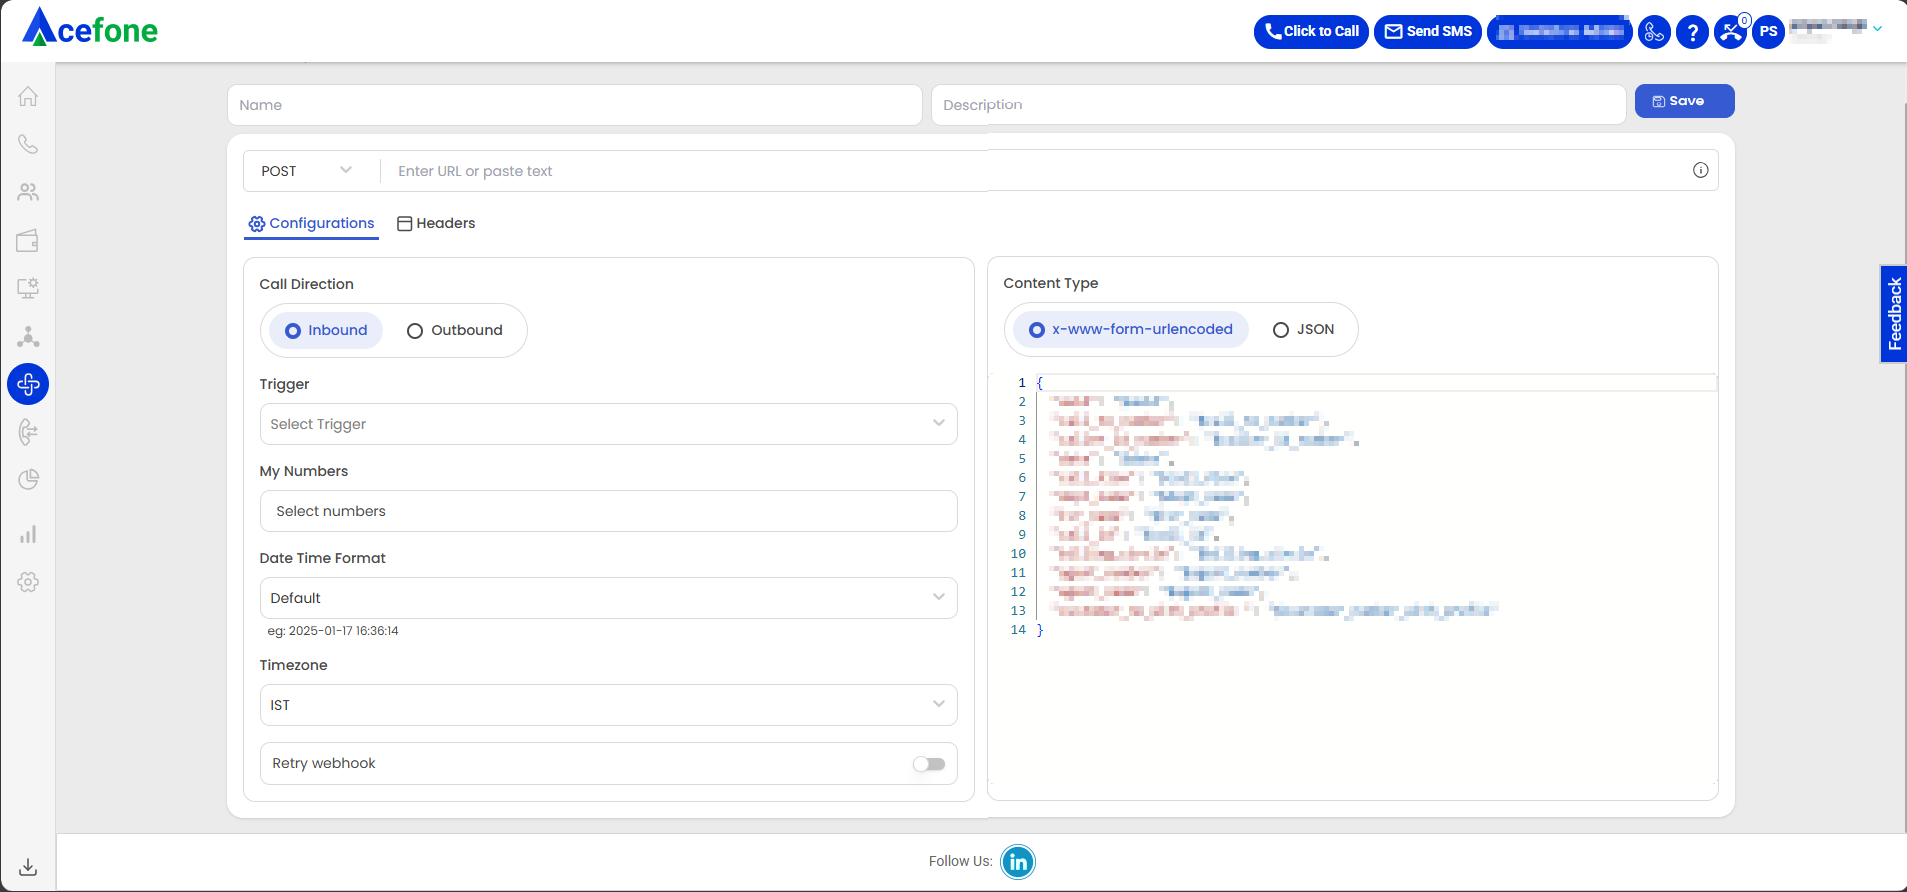
- Create the First Webhook by entering the below mentioned details.
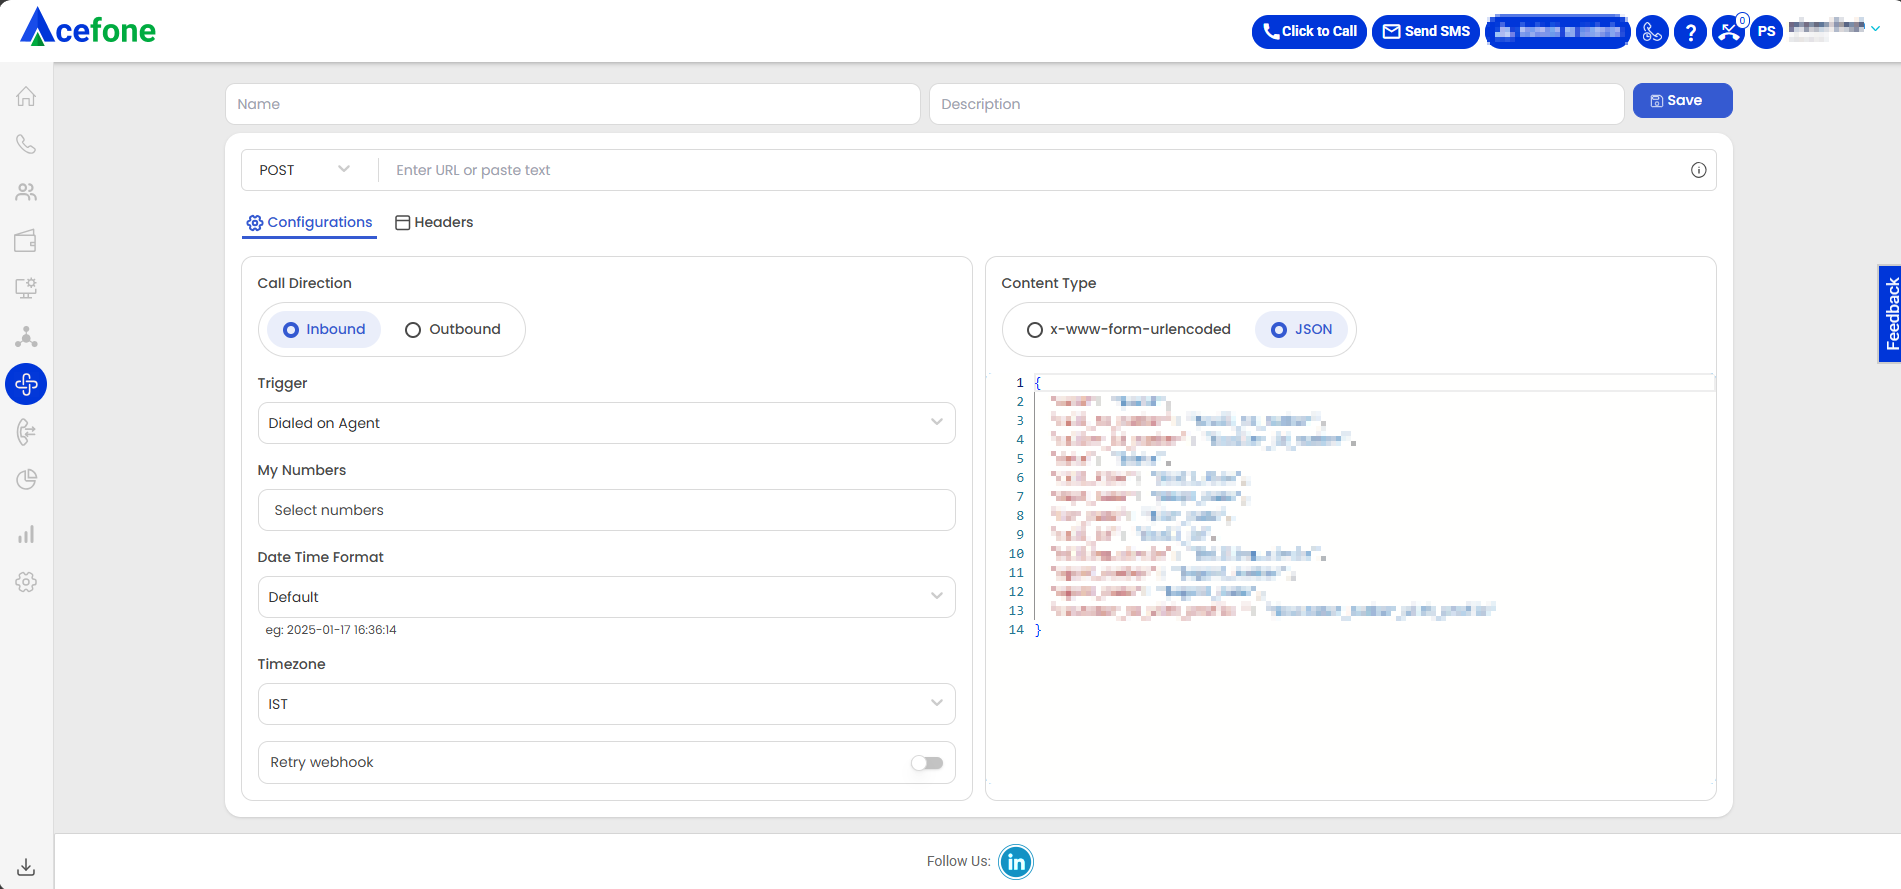
| Field | Value |
|---|---|
| Name | Agent Pop up IC |
| Description | Agent Pop up LS |
| Request | POST |
| URL | Same as that is mentioned in the Universal Telephony Connector >> Configure >> Agent Popup API Note: URL may vary for each account. |
| Call Direction | Inbound |
| Trigger | Dialed on Agent |
| Content Type | application/json |
| My Numbers | Choose the virtual number from the list |
| Date Time Format | Choose the date and time format. |
| Time zone | Choose the time zone |
Enter the below code in Response Body:
{
  "CallSessionID": "$uuid",
  "DisplayNumber": "$call_to_number",
  "SourceNumber": "$customer_number_with_prefix",
  "StartTime": "$start_stamp",
  "DestinationNumber": "$answer_agent_number",
  "Direction": "Inbound"
}
Click Save button once all the details have been added.
- Create the Second Webhook by entering the below mentioned details.
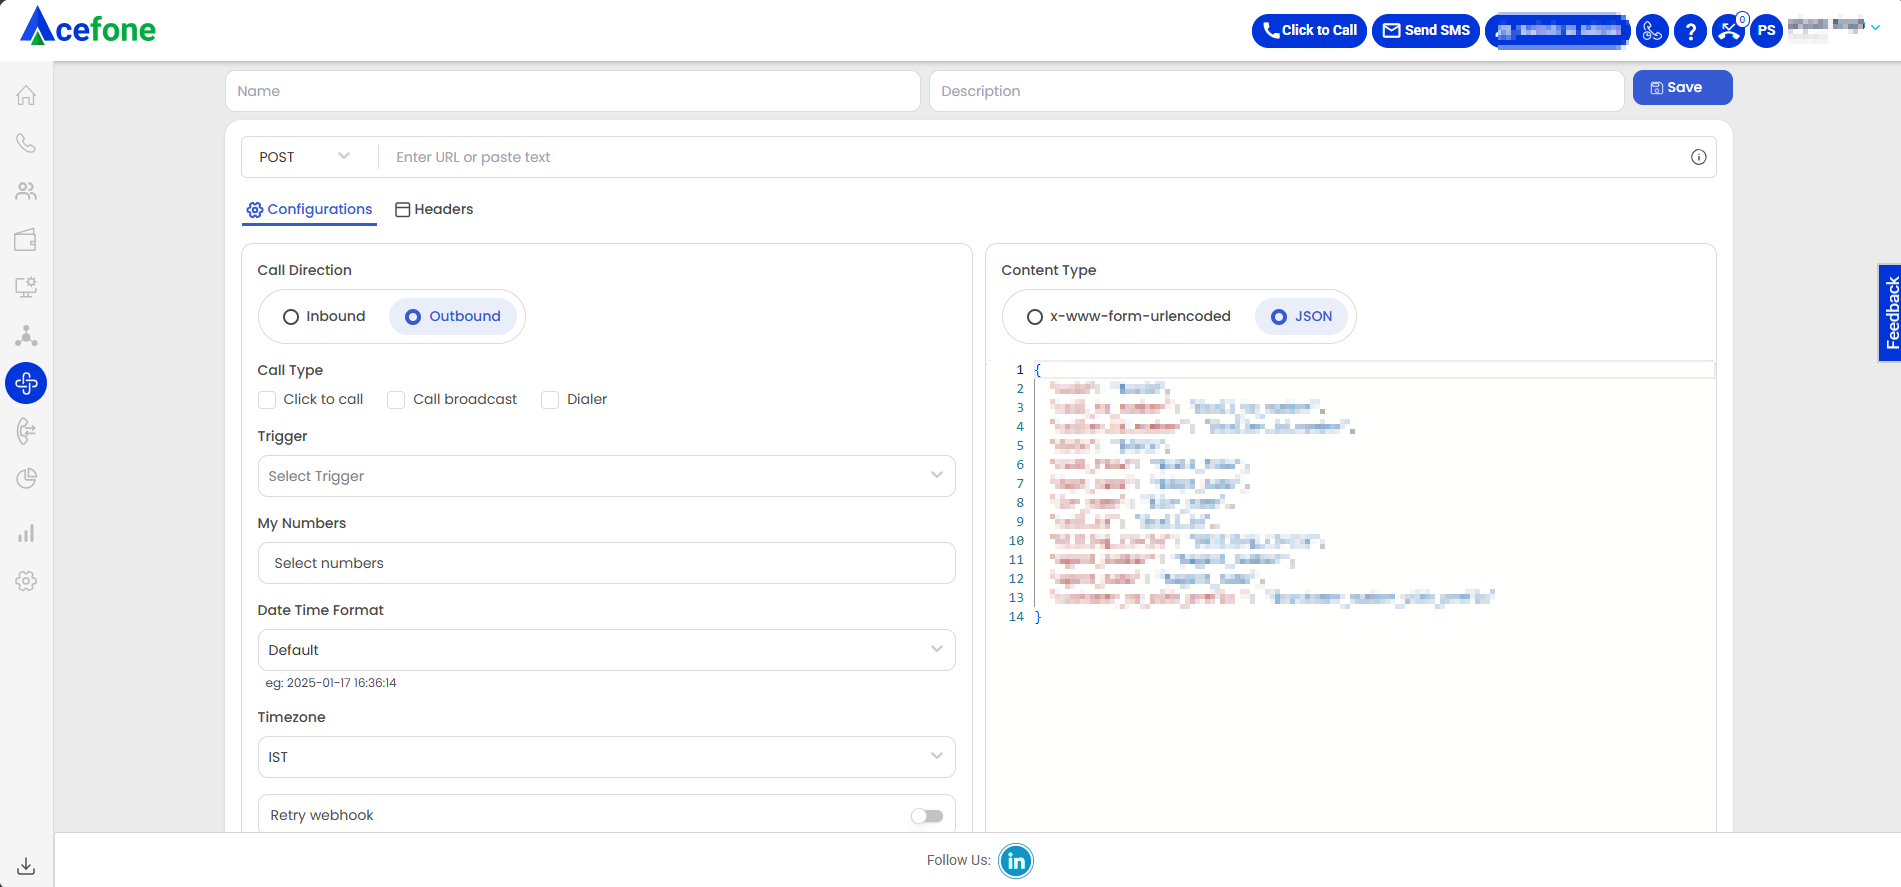
| Field | Value |
|---|---|
| Name | Agent Pop up OB |
| Description | Agent Pop up LS |
| Trigger | Call Answered by Agent |
| URL | Same as that is mentioned in the Universal Telephony Connector >> Configure >> Agent Popup API Note: URL may vary for each account. |
| Request | POST |
| Call Type | Outbound |
| Outbound Type | Click to Call |
| Content Type | application/json |
| My Numbers | Choose the virtual number from the list |
| Time zone | Choose the time zone |
Enter the below code in Response Body:
{
  "CallSessionID": "$uuid",
  "DisplayNumber": "$caller_id_number",
  "SourceNumber": "$answer_agent_number",
  "StartTime": "$start_stamp",
  "DestinationNumber": "$call_to_number",
  "Direction": "Outbound",
  "CallDuration": "0",
  "Status": "Answered"
}
Click Save button once all the details have been added.
- Create the Third Webhook by entering the below mentioned details Call Log API:
| Field | Value |
|---|---|
| Name | Call Log API LS Incoming Answered |
| Description | Call Log API LS Incoming Answered |
| Trigger | Call answered by Agent (Hangup) |
| URL | Same as that is mentioned in the Universal Telephony Connector >> Configure >> Agent Popup API Note: URL may vary for each account. |
| Request | POST |
| Call Type | Inbound |
| Content Type | application/json |
| My Numbers | Choose the virtual number from the list |
| Time zone | Choose the time zone |
Enter the below code in Response Body:
{
  "CallSessionId": "$uuid",
  "DisplayNumber": "$call_to_number",
  "SourceNumber": "$caller_id_number",
  "StartTime": "$start_stamp",
  "EndTime": "$end_stamp",
  "CallDuration": "$duration",
  "DestinationNumber": "$answered_agent.number",
  "Status": "$call_status",
  "ResourceURL": "$recording_url",
  "Direction": "$direction"
}
Click Save button once all the details have been added.
- Create the Fourth Webhook by entering the below mentioned details Call Log API:

| Field | Value |
|---|---|
| Name | Call Log API LS Incoming Missed |
| Description | Call Log API LS Incoming Missed |
| Trigger | Call missed by Agent (Hangup) |
| URL | Same as that is mentioned in the Universal Telephony Connector >> Configure >> Agent Popup API Note: URL may vary for each account. |
| Request | POST |
| Call Type | Inbound |
| Content Type | application/json |
| My Numbers | Choose the virtual number from the list |
| Time zone | Choose the time zone |
Enter the below code in Response Body:
{
  "CallSessionId": "$uuid",
  "DisplayNumber": "$call_to_number",
  "SourceNumber": "$caller_id_number",
  "StartTime": "$start_stamp",
  "EndTime": "$end_stamp",
  "CallDuration": "$duration",
  "DestinationNumber": "$first_missed_agent_number",
  "Status": "$call_status",
  "ResourceURL": "$recording_url",
  "Direction": "$direction"
}
Click Save button once all the details have been added.
- Create the Fifth webhook by entering the below mentioned details Call Log API:

| Field | Value |
|---|---|
| Name | Call Log API LS Outgoing |
| Description | Call Log API LS Outgoing |
| Trigger | Call hangup (Answered) (Updated) |
| URL | Same as that is mentioned in the Universal Telephony Connector >> Configure >> Agent Popup API Note: URL may vary for each account. |
| Request | POST |
| Call Type | Outbound |
| Outbound Type | Click to Call |
| Content Type | application/json |
| My Numbers | Choose the virtual number from the list |
| Time zone | Choose the time zone |
Enter the below code in Response Body:
{
  "SourceNumber": "$answered_agent.number",
  "CallerSource": "$caller_id_number",
  "DestinationNumber": "$call_to_number",
  "DisplayNumber": "$caller_id_number",
  "StartTime": "$start_stamp",
  "EndTime": "$end_stamp",
  "CallDuration": "$duration",
  "ResourceURL": "$recording_url",
  "Direction": "Outbound",
  "CallSessionId": "$uuid",
  "Status": "$call_status"
}
Click Save button once all the details have been added.
📙 Leadsquared integration provides the below-listed functionalities
- Click To Call (Outbound Calls)
- Agent Extension
- Call Notes or Call Description
- Call Detail Records
Follow the steps below to start using Leadsquared on Acefone.
- Log In to the app.

- To use the Click to Call functionality, click on the number to which you want to make a call.

You’ll see the following pop-up.

Click on Call to make a call.
You’ll see the following message once the call has been made successfully.

- To view the Call Detail Records, click on Activity History.

The CDR gives the following details.

Updated about 1 year ago